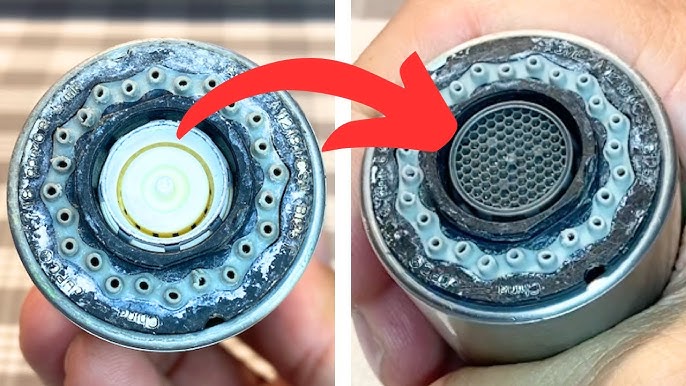
Have you ever noticed your kitchen sink’s water flow slowing to a frustrating trickle? It might be time to clean your Kohler kitchen sink aerator.
But once you’ve done the cleaning, the challenge is reassembling it. If you’re worried about putting the pieces back together, don’t be. You’re about to discover a step-by-step guide that makes reassembling your Kohler kitchen sink aerator a breeze. Imagine turning on your tap and enjoying a smooth, steady stream of water again.
By following these easy instructions, you can ensure your sink is functioning at its best, saving you from the hassle of more extensive plumbing issues. This article will walk you through the process, empowering you to handle your kitchen maintenance like a pro. Dive in and take control of your kitchen’s water flow with confidence.

Credit: www.youtube.com
Tools Needed
Reassembling a Kohler kitchen sink aerator after cleaning is easy. The right tools make the process smooth and hassle-free. Having the correct tools ensures a secure fit and avoids damage.
Essential Tools For Reassembly
Gather these essential tools before you begin. They help ensure a proper fit.
Adjustable Wrench
An adjustable wrench is crucial for tightening and securing parts. It fits various sizes of nuts and bolts. Use it to firmly attach the aerator without over-tightening.
Needle-nose Pliers
Needle-nose pliers are useful for gripping and twisting small parts. They help hold onto tiny components during reassembly.
Teflon Tape
Teflon tape helps create a watertight seal. Wrap it around threads to prevent leaks. It ensures a snug fit between the aerator and faucet.
Soft Cloth
A soft cloth protects surfaces from scratches. Use it to hold delicate parts. It also helps wipe away excess water during the process.
Replacement Parts
Keep replacement parts handy, like washers or seals. They may need swapping if worn or damaged. This ensures the aerator functions properly after reassembly.
Using these tools simplifies the reassembly process. Each tool plays a role in achieving a perfect fit.
Preparing The Workspace
Reassembling a Kohler kitchen sink aerator after cleaning involves organizing tools and parts on a clean work surface. Ensure all components are dry and free from debris to facilitate smooth reassembly. Proper preparation of the workspace aids in an efficient and hassle-free process.
Preparing your workspace is a crucial step before reassembling a Kohler kitchen sink aerator after cleaning. A well-organized area not only speeds up the process but also helps prevent misplacing tiny parts. Imagine how frustrating it would be to lose a small component just because your workspace was cluttered.Clear The Area
Start by ensuring your workspace is free from unnecessary items. A clean and tidy area allows you to focus solely on the task at hand. This minimizes distractions and reduces the risk of losing small parts.Gather Your Tools
Have the necessary tools within arm’s reach. A small wrench, a soft cloth, and a bowl of clean water are essential. Having them ready helps you work efficiently without scrambling around mid-task.Use A Tray Or Towel
Lay down a tray or towel to catch any small pieces that might roll away. This simple step can save you from the headache of searching for parts that fell off the counter. It also helps in keeping the components organized and within sight.Check For Adequate Lighting
Ensure your workspace is well-lit. Good lighting helps you see small details clearly, ensuring precision during reassembly. You can use a desk lamp or work near a window for natural light.Mind Your Time
Set aside a specific time to work on this task without interruptions. Being rushed can lead to mistakes or skipped steps. Consider how much more satisfying it is to complete a task when you’re fully focused. Taking these preparatory steps can make reassembling your Kohler kitchen sink aerator a smoother and more enjoyable process. What other tips do you find helpful when setting up your workspace for a project like this?Disassembling The Aerator
The Kohler kitchen sink aerator helps control water flow and pressure. Regular cleaning keeps it working efficiently. Disassembling the aerator is a straightforward process. It involves removing it from the faucet and identifying its parts. This guide simplifies the process for you.
Removing The Aerator
First, locate the aerator at the end of the faucet spout. It often appears as a small cylinder. Use a wrench or your hand to unscrew it. Turn it counterclockwise to loosen. If it’s stuck, wrap a cloth around it for better grip. This prevents scratches on the aerator’s surface. Once loose, carefully detach it from the faucet.
Identifying Parts
After removal, examine the aerator closely. It’s made of several small parts. These include a screen, washers, and sometimes a flow restrictor. Lay them on a clean surface in order. This helps in reassembly later. Each part has a specific function. Knowing them ensures proper cleaning and reassembly.
Take note of the order and position of each part. This prevents confusion during reassembly. Pay attention to any worn-out components. Consider replacing them if necessary. Proper identification aids in efficient cleaning and reassembly.
:max_bytes(150000):strip_icc()/removing-a-faucet-aerator-2718836-hero-01d87b8d7dd942ce8a8eee99f555781f.jpg)
Credit: www.thespruce.com
Cleaning Components
Reassembling a Kohler kitchen sink aerator after cleaning involves aligning threads carefully. Ensure each component fits snugly to prevent leaks. Tighten the aerator securely for optimal water flow and pressure.
Cleaning the components of your Kohler kitchen sink aerator is an essential step in maintaining its efficiency and extending its lifespan. You’ve taken the time to disassemble it and remove any built-up grime and debris. Now, it’s crucial to ensure each part is thoroughly cleaned before putting it back together. Let’s dive into the specifics of cleaning two critical components: the screen and the washer.Cleaning The Screen
The screen in your aerator is like the lungs of your faucet, filtering out tiny particles and ensuring a smooth flow of water. To clean it effectively, start by rinsing the screen under warm running water. Use a soft-bristled brush to gently scrub away any stubborn deposits or mineral build-up. If the screen looks clogged or discolored, soak it in a solution of equal parts vinegar and water for about 15 minutes. This natural cleaning method can dissolve mineral deposits without harsh chemicals. Have you ever noticed how a clean screen can make your water flow feel like a gentle waterfall?Checking The Washer
The washer acts as a seal, preventing leaks and ensuring a tight fit. Check the washer for any signs of wear or damage. A cracked or misshapen washer can cause annoying drips and water wastage. Gently clean the washer with a damp cloth, removing any dirt or debris. If you find it damaged, consider replacing it with a new one. A tiny investment in a fresh washer can save you from future plumbing headaches. Isn’t it satisfying to know that such a small component can play a big role in your kitchen’s efficiency? As you clean each component, ask yourself: Have I overlooked any detail that might affect the aerator’s performance? Attention to these small details can make all the difference in your kitchen’s functionality.Reassembling The Aerator
After cleaning, reassemble a Kohler kitchen sink aerator by aligning parts correctly. Ensure each component fits snugly. Tighten securely to prevent leaks.
Reassembling the aerator might seem challenging, but it can be simple. After cleaning, getting the Kohler kitchen sink aerator back together requires focus. Each piece fits together like a puzzle. Follow these steps to ensure proper assembly. This will help your sink function well.Positioning The Screen
Place the screen carefully on the aerator. Ensure it is flat and centered. The screen filters water and prevents debris. Proper placement is crucial for functionality.Securing The Washer
Next, place the washer on top of the screen. It creates a seal to prevent leaks. Make sure it fits snugly in its spot. A loose washer can cause water issues. Double-check to ensure it’s secure.Attaching The Housing
Finally, connect the housing to complete the assembly. Align it with the aerator components. Twist it until it feels tight and secure. The housing protects the internal parts. Ensure it is firmly attached for optimal performance.Testing The Aerator
After cleaning your Kohler kitchen sink aerator, reassembly is key. Ensuring it works properly is crucial. Testing helps confirm that everything is in place. This prevents future plumbing issues and maintains water efficiency. Let’s go through the steps to test your aerator effectively.
Checking Water Flow
Turn on the faucet slowly. Observe how water flows from the aerator. It should be even and smooth. Any sputtering or uneven flow indicates an issue. Adjust the aerator if needed. Make sure the water stream is consistent. This ensures proper cleaning and use of water.
Ensuring No Leaks
Check around the aerator for any leaks. Use a dry cloth to wipe the area. If moisture appears, the aerator might be loose. Tighten it gently by hand. Avoid using tools to prevent damage. Recheck for leaks after adjustments. A leak-free aerator saves water and prevents damage.
Maintenance Tips
Reassembling a Kohler kitchen sink aerator after cleaning involves aligning components and securing them tightly. Ensure each piece fits snugly for optimal water flow. Regular maintenance helps prevent clogs and ensures efficient performance.
Maintaining your Kohler kitchen sink aerator doesn’t just ensure better water flow; it extends the life of your fixture. Proper maintenance can save you from unexpected issues like low water pressure or leaks. Plus, a well-maintained aerator means a cleaner and more efficient kitchen experience.Regular Cleaning
Regular cleaning is the cornerstone of aerator maintenance. A clean aerator ensures optimal water flow and prevents mineral buildup. You might wonder how often should you clean it? Aim for at least once every three months. Start by unscrewing the aerator from the faucet. Use a toothbrush to gently scrub away any debris or mineral deposits. Rinse thoroughly before reassembling. I remember the first time I cleaned my aerator. The water pressure improved dramatically, and it felt like a brand-new faucet. Have you checked yours recently?Inspecting For Wear
Inspection is as crucial as cleaning. Look closely at the aerator for any signs of wear or damage. Are the threads intact? Is there any rust or corrosion visible? If you notice any damage, consider replacing the worn parts. A small investment now can prevent bigger problems later. Think of it this way: a small crack might not seem like a big deal today. But over time, it could lead to leaks and water wastage. When was the last time you inspected your aerator for wear?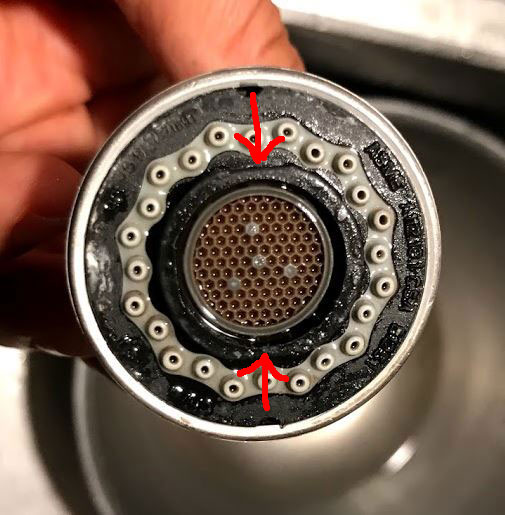
Credit: blog.lincomatic.com
Frequently Asked Questions
How To Disassemble A Kitchen Sink Aerator?
Turn off the water supply and plug the drain. Use pliers to unscrew the aerator counterclockwise. Remove any washers or screens. Clean and reassemble the components. Reattach the aerator by screwing it back onto the faucet.
How To Open A Kohler Faucet Aerator?
Use a flat tool or coin to unscrew the aerator clockwise. Hand-tighten back after cleaning, ensuring secure fit.
How To Remove Kohler Faucet Aerator Without Tool?
Grip the aerator with a rubber glove for better traction. Gently twist counterclockwise to unscrew it. If it’s stuck, use a rubber band for extra grip. Ensure the faucet is off before starting. This method avoids the need for tools and prevents damage.
How To Reset Sink Aerator?
To reset a sink aerator, unscrew it from the faucet using pliers. Clean any debris or mineral deposits. Reassemble and screw it back onto the faucet. Test water flow to ensure proper function. Regular cleaning prevents buildup and maintains water pressure.
Conclusion
Reassembling a Kohler kitchen sink aerator is simple after cleaning. Follow the steps carefully. Each part has its place. Tighten connections properly to prevent leaks. Check the water flow once assembled. A clean aerator improves water quality and pressure. Regular maintenance keeps your sink working well.
Save money on repairs with easy DIY cleaning. Enjoy fresh water and a clean sink. Share these tips with friends for a cleaner kitchen. Keep your home efficient and comfortable.