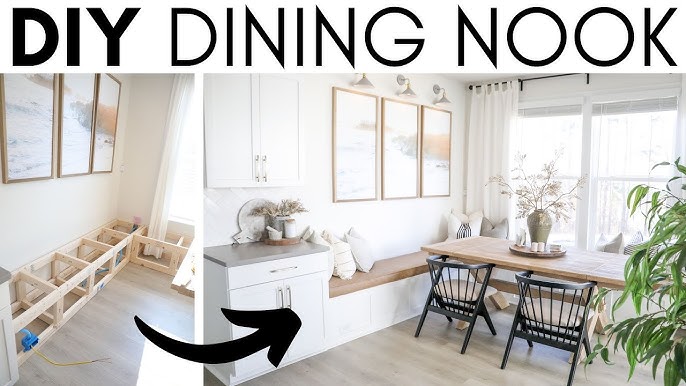
Imagine transforming your kitchen into a cozy, multifunctional space where you can sip your morning coffee, store your cookbooks, and even host a casual lunch. Building a kitchen nook bench seat with storage can make this vision a reality.
It’s not just about adding furniture; it’s about creating an inviting space that enhances your everyday life. You might be wondering how you can achieve this without spending a fortune or hiring a professional. The good news is that you can design and build your own nook bench seat with storage with some basic tools and a little bit of creativity.
This project will not only save you money but also provide you with a sense of accomplishment every time you sit down to enjoy your meals. Stick around as we guide you step-by-step through the process. By the end of this article, you’ll have the know-how to create a charming and functional kitchen nook that reflects your personal style and maximizes your space.

Credit: www.makingmanzanita.com
Materials And Tools Needed
Building a kitchen nook bench seat with storage is a rewarding project. It adds charm and functionality to your space. Before starting, gather the right materials and tools. This ensures a smooth building process.
Materials Needed
Choose quality materials for durability. Start with wood. Plywood is strong and versatile. You need enough for the bench frame and seat. Use screws to hold the pieces together securely. Wood glue offers extra strength for joints.
Buy hinges for the storage lid. They allow easy access. Choose handles for a stylish touch. Consider cushions for comfort. Fabric and foam make cozy seating. Select colors that match your kitchen theme.
Tools Needed
Gather essential tools to make construction easier. A saw cuts the wood to size. A drill creates holes for screws. Use a screwdriver to tighten the screws securely.
A measuring tape ensures accuracy. It helps in cutting precise lengths. Sandpaper smooths rough edges. It creates a polished finish. A paintbrush applies paint or stain. Choose colors that complement your kitchen decor.
Having these materials and tools ready is crucial. It saves time and reduces frustration. You can focus on building the perfect nook bench seat.

Credit: www.seanandann.org
Choosing The Right Space
Creating a kitchen nook bench seat with storage involves selecting the ideal corner. Optimize space efficiently by measuring dimensions accurately. This cozy addition enhances functionality, offering extra seating and convenient storage solutions for everyday items.
Creating a kitchen nook bench seat with storage is a brilliant way to optimize your kitchen space. But before you grab your tools, choosing the right space is crucial. The location you select will determine not only the functionality but also the aesthetic appeal of your bench seat.
Understand Your Kitchen Layout
First, take a good look at your kitchen layout. Is there a corner that seems to collect clutter? That might just be the perfect spot. Consider areas that receive good natural light, making it a cozy place for morning coffee or a family meal.
Measure The Available Space
Accurate measurements are essential. Use a measuring tape to determine the width, depth, and height of the potential nook space. You want to ensure the bench seat fits perfectly without overwhelming the area. A misfit can turn a cozy nook into an awkward inconvenience.
Consider Traffic Flow
Avoid placing your bench seat in high-traffic zones. You don’t want it to become a tripping hazard or hinder movement. Think about how people move through your kitchen daily. Is there enough room for everyone to maneuver comfortably around the bench?
Think About The View
A bench seat is more inviting if it offers a pleasant view. Position your nook where it looks out onto a garden or a window. A nice view can make sitting there more enjoyable, turning it into a preferred spot for relaxation.
Plan For Accessibility
Consider how easy it is to access the storage under the bench. You want to make sure that opening and closing the storage compartments doesn’t require moving furniture or other items. Accessibility will encourage regular use of the storage space.
Reflect On The Purpose
Ask yourself what you want from this nook bench. Is it meant for dining, working, or reading? The purpose will guide the size and design of your bench. For example, a reading nook might need more cushion, while a dining seat might require sturdier support. Choosing the right space is more than just finding an empty corner. It’s about visualizing how this bench will fit into your daily life. What part of your kitchen calls out for transformation?
Design And Dimensions
Crafting a kitchen nook bench seat with storage requires precise design and dimensions. Ensure the bench fits snugly into your space and provides ample storage. Balance comfort with functionality by choosing the right height and depth for the seat.
Designing a kitchen nook bench seat with storage is both a creative and practical task. This project allows you to add a cozy seating area while maximizing space with built-in storage. Before you start building, it’s crucial to have a well-thought-out design and precise dimensions. This ensures your nook fits perfectly into your kitchen and meets your functional needs.
Measuring The Area
Start by identifying the space where you want to install your bench seat. Use a measuring tape to determine the length, width, and height of the available area. Consider any obstructions like windowsills, radiators, or baseboards that might affect your measurements. Jot down these measurements carefully. This will serve as the foundation for your design. Think about how much seating and storage you need, and ensure the dimensions will accommodate these requirements.
Sketching Your Design
Once you have your measurements, it’s time to sketch your design. A simple pencil drawing can help visualize your ideas before you commit. Outline the bench’s shape, whether it’s straight, L-shaped, or U-shaped, based on your kitchen’s layout. Consider the height and depth of the bench for comfort. Will you add cushions or a backrest? Indicate storage options like drawers or lift-up seats in your sketch. A detailed design helps avoid surprises later and ensures the build process goes smoothly. Designing with precision requires attention to detail, but it’s also an opportunity to reflect your personal style. What unique features can you add to your nook to make it special?
Building The Frame
Crafting a kitchen nook bench seat with storage begins by building a sturdy frame. This involves measuring the space, cutting wood to size, and assembling the pieces. Ensure the frame is strong enough to hold weight and fit snugly into the designated area for optimal functionality.
Building a kitchen nook bench seat with storage is a rewarding DIY project that adds both function and charm to your home. The frame is the backbone of your bench and needs to be sturdy and well-constructed. It’s the foundation upon which you’ll add seating and storage, so getting it right is crucial. Let’s dive into the steps of building the frame and ensure your project starts off strong.
Cutting Wood Pieces
The first step in building your frame is to cut the wood pieces to the correct size. Measure your space carefully to determine the dimensions of your bench. Remember, precise measurements mean a perfect fit. Use a saw to cut your pieces, and double-check each piece against your measurements. I once underestimated the importance of this step and ended up with a wobbly bench. Learn from my mistake: measure twice, cut once!
Assembling The Frame
With your pieces ready, it’s time to assemble the frame. Begin by laying out your cut pieces to form the base of your bench. Use strong wood glue and screws to join the pieces together. Ensure everything is square and level to avoid a crooked bench. This part of the process can be a real test of patience, but it’s key to a sturdy build. As you work, think about how the storage will be accessed. Will it be from the front, or will you lift the seat? These decisions will guide the frame design. Have you considered adding extra support in the middle? This can prevent sagging over time, especially if the bench will often double as seating for your family dinners. By focusing on these details, your kitchen nook bench seat will not only be a beautiful addition to your home but also a functional one.
Creating The Storage Area
Design a cozy kitchen nook bench seat with storage to maximize space. This dual-purpose furniture adds seating and keeps clutter hidden. Enhance your kitchen’s functionality and style with this practical solution.
Creating a kitchen nook bench seat with storage is a practical project. It not only adds seating but also provides valuable storage space. The storage area is essential for organizing kitchen items efficiently. This section will guide you through building the storage box and adding dividers. These elements will maximize the usability of your nook bench seat.
Building The Storage Box
Start by measuring the space where the bench seat will go. Use these measurements to cut the wood panels for the storage box. Ensure each panel fits perfectly into your designated area. Assemble the panels using screws and wood glue for stability. This creates a sturdy base for your bench seat. Consider the height and depth of the box to ensure comfort and ample storage. For the base, use plywood or MDF for durability. These materials support weight and resist wear. Cut the base to fit snugly within the frame of your nook. Attach it securely to the box using screws. This step is crucial for maintaining the integrity of the storage area. Make sure all edges are smooth to prevent injury or damage.
Adding Dividers
Adding dividers organizes your storage space effectively. Measure the interior of the box to determine the size of each section. Use thin wood panels as dividers for a clean look. Secure them inside the storage box with brackets or glue. This keeps each section stable and prevents items from shifting. Design the dividers based on what you plan to store. Taller dividers are great for larger kitchen items. Shorter ones work well for small tools or gadgets. Adjust the placement and number of dividers as needed. This ensures a customized storage solution that meets your needs. Prioritize functionality and ease of access when arranging the dividers.
Attaching The Backrest
Attaching the backrest adds comfort and style to your kitchen nook bench seat. Secure the backrest using screws and brackets for stability. Ensure it aligns properly with the seat for a cohesive look and functional use.
Attaching the backrest to your kitchen nook bench seat with storage adds comfort. It also enhances the overall look. This step requires precision and care. The backrest not only provides support but also ties the entire piece together. Follow these steps to secure and customize the backrest effectively.
Securing The Backrest
Ensure the backrest aligns perfectly with the seat. Use a level to check this alignment. Drill pilot holes for the screws. This prevents wood from splitting. Secure the backrest using heavy-duty screws. Ensure they are long enough to hold firmly. Use a power drill for efficiency. Check the stability by applying gentle pressure. Make adjustments if needed. A stable backrest improves safety and comfort.
Customizing The Angle
Choose an angle that suits your comfort. Some prefer a slight recline. Others like an upright position. Use a protractor to measure the angle. Mark the desired position on the wood. Adjust the backrest accordingly. Secure it at this angle with brackets. Test the backrest by sitting. Make sure it feels comfortable. Adjust as necessary to find the perfect fit. A well-angled backrest ensures a pleasant seating experience.
Installing The Bench Seat
Creating a functional kitchen nook bench seat adds charm and utility. The process of installation is straightforward. With a few tools and steps, you can achieve a perfect fit. This section guides you through cutting the seat and attaching hinges for storage access.
Cutting And Fitting The Seat
Begin by measuring the space for your bench seat. Accurate measurements ensure a snug fit. Use a saw to cut the wood according to your measurements. Sand the edges smoothly to prevent splinters. Place the seat on the bench frame to check alignment. Adjust if needed.
Attaching Hinges For Access
Storage access is crucial for a functional bench. Select sturdy hinges that can support the seat’s weight. Position the hinges evenly along the back edge of the seat. Mark the spots for screws and pre-drill holes. Secure the hinges with screws, ensuring they move smoothly. Test the seat for easy opening and closing.
Finishing Touches
Adding the final touches to your kitchen nook bench seat with storage brings charm and functionality. Soft cushions enhance comfort, while colorful throws add style. Organize with baskets or boxes to make the most of the storage space.
Creating a kitchen nook bench seat with storage is a rewarding DIY project, but it’s the finishing touches that bring it to life. This is where your creativity shines and you transform a functional piece into a cozy, personalized spot in your home. Let’s dive into the final steps that make your nook bench both stylish and comfortable.
Sanding And Painting
The first step in finishing your kitchen nook bench is sanding the wood surfaces. Use fine-grit sandpaper to smooth out any rough edges or imperfections. This ensures a professional look and prepares the surface for painting or staining. Painting is your chance to add personality. Choose a color that complements your kitchen decor. Whether you opt for a bright hue or a subtle shade, make sure it reflects your style. Apply at least two coats for a durable finish.
Adding Cushions
Cushions are the key to transforming your bench into a cozy seating area. Measure the dimensions of your bench and shop for cushions that fit perfectly. Consider fabrics that are both durable and easy to clean, especially if you have kids or pets. Add a mix of patterned and solid cushions to create visual interest. This is where you can express your style—go bold or keep it simple. The right cushions not only enhance comfort but also add a touch of warmth. — Have you ever considered how a few simple changes can elevate your space? With these finishing touches, your kitchen nook bench becomes a place you’ll love to relax in every day.
Tips For Maintenance
Maintaining your kitchen nook bench seat with storage is vital. Proper care ensures long-lasting durability and fresh appearance. Regular maintenance can prevent damage and keep it looking its best.
Regular Cleaning
Dust and dirt can accumulate quickly on surfaces. Wipe the bench with a damp cloth weekly. Use a mild cleaner for stubborn stains. Avoid harsh chemicals that can damage the finish.
Inspect For Damage
Check for loose screws or bolts monthly. Tighten them to prevent wear. Look for signs of wood damage or splitting. Early detection can prevent costly repairs.
Protect From Moisture
Moisture can warp wood and ruin upholstery. Keep the bench dry by wiping spills immediately. Use waterproof covers if necessary. This helps in maintaining the bench’s integrity.
Avoid Excessive Weight
Overloading the storage can strain the bench structure. Store only what is necessary to avoid damage. Spread weight evenly to maintain balance and stability.
Polish And Treat Wood
Wood can lose its shine over time. Use wood polish to restore its look. Consider applying a protective treatment annually. This helps maintain its natural beauty and resilience.

Credit: www.youtube.com
Frequently Asked Questions
How Deep Should A Kitchen Nook Bench Be?
A kitchen nook bench should typically be 18 to 24 inches deep. This depth ensures comfortable seating and space for cushions. Consider the size of your space and table to optimize comfort and functionality. Adjust the depth according to your needs while maintaining a practical layout.
How Much To Build A Breakfast Nook Bench?
Building a breakfast nook bench costs between $200 and $800, depending on materials and design complexity. DIY projects are cheaper, while custom-built options might be pricier. Consider wood type, upholstery, and additional features for accurate budgeting. Professional installation can also affect the overall cost.
What Is Kitchen Bench Seating Called?
Kitchen bench seating is commonly called a “banquette. ” It offers cozy seating and adds style to your kitchen. Banquettes are versatile, often featuring built-in storage options. Perfect for casual dining, they maximize space and create a welcoming atmosphere. Enhance kitchen functionality and aesthetics with a well-designed banquette.
What Is The Difference Between A Breakfast Nook And A Kitchen Nook?
A breakfast nook is a cozy dining area within the kitchen, often featuring built-in seating. A kitchen nook can be any small, informal dining space in or near the kitchen, not necessarily built-in. Both provide a casual spot for meals.
Conclusion
Building a kitchen nook bench seat with storage is a rewarding project. It adds style and function to your kitchen space. With the right tools, anyone can do it. Measure your space carefully. Choose materials that fit your home’s decor.
Remember to think about comfort too. Cushions make a big difference. Storage helps keep your kitchen tidy. Follow the steps, and you’ll succeed. Enjoy your new cozy nook. It’s perfect for family meals or morning coffee. Your kitchen will feel more inviting and organized.
Happy building!