Imagine transforming your kitchen into a more functional and organized space without breaking the bank. Adding a kitchen bench with storage can be your secret weapon.
Not only does it provide extra seating, but it also helps you declutter and keep essential items within reach. As you dive into this guide, you’ll discover simple steps to create your own stylish and practical kitchen bench. Whether you’re a DIY enthusiast or a first-timer, this project is designed to be approachable and rewarding.
Get ready to unlock the potential of your kitchen and make the most of every inch of space. Your journey to a smarter and more beautiful kitchen starts here.
Credit: amylanham.com
Materials And Tools Needed
Building a kitchen bench with storage is a practical project. It combines seating with organization. To start, gather the right materials and tools. This ensures a smooth building process. In this section, we’ll list essential items. So, let’s dive into what you’ll need.
Materials Needed
First, choose the right wood. Plywood is durable and easy to work with. You’ll also need screws. They hold everything together. Get wood glue for extra strength. It helps bond the wood pieces. Purchase hinges if your bench has a lid. They allow easy access to storage. Sandpaper smooths out rough edges. It prepares the surface for finishing. Finally, pick a wood finish. Paint or stain adds a protective layer.
Tools Required
A saw is essential. It cuts wood to size. Use a drill for making holes. It helps drive screws into place. A measuring tape ensures accuracy. It prevents costly mistakes. A square helps maintain right angles. It keeps your bench aligned. Finally, a screwdriver tightens screws. It ensures a secure fit.
Having these materials and tools ready is crucial. They are the foundation of your project. With them, building your bench becomes manageable and fun.

Credit: www.reddit.com
Choosing The Right Design
Choosing the right design is crucial when building a kitchen bench with storage. It impacts the functionality and aesthetics of your kitchen. A well-chosen design ensures efficient use of space. It also enhances the overall look of your kitchen. Consider the style, size, and material for the best results.
Style And Aesthetics
Consider your kitchen’s existing style. A modern kitchen might need a sleek, minimalist bench. A rustic kitchen could benefit from a wooden, vintage-style bench. Match the bench with your kitchen’s color scheme for a cohesive look.
Size And Space
Measure the available space in your kitchen. A large bench might overpower a small kitchen. A compact bench can fit snugly into a small area. Ensure there’s enough space for movement around the bench.
Material Selection
Choose materials that suit your needs. Wood offers a warm, traditional look. Metal can provide a modern, industrial feel. Consider durability, especially if the bench will be heavily used.
Functionality And Features
Think about storage needs. Do you need shelves, drawers, or both? Consider adding a lift-top for easy access. These features enhance the utility of your bench.
Budget Considerations
Set a budget before designing your bench. Costs can vary based on materials and design complexity. Stick to your budget to avoid overspending.
Measuring And Planning
Accurate measurements are vital before constructing a kitchen bench with storage. Planning ensures proper fit and functionality, optimizing space effectively. This enhances kitchen organization and aesthetics seamlessly.
Building a kitchen bench with storage can be a rewarding DIY project that not only enhances your kitchen’s functionality but also adds a personal touch. Before you start cutting wood and assembling pieces, measuring and planning are crucial steps that set the foundation for success. Proper planning ensures your bench fits perfectly and offers the storage space you need. Here’s how you can nail it down with precision.Taking Accurate Measurements
Accurate measurements are the backbone of any successful project. Start by measuring the space where you plan to install the bench. Use a tape measure to gauge the height, width, and depth of the area. Double-check these measurements to avoid costly mistakes. Consider the height of your existing counters and appliances to ensure the bench won’t obstruct anything. A little tip: jot down these numbers immediately—your memory might be more unreliable than you’d think!Creating A Detailed Plan
Once you have your measurements, it’s time to create a detailed plan. Sketch out how you envision the bench to look, including dimensions and storage compartments. Consider how much storage you need. Do you want to store pots and pans, or perhaps smaller items like table linens? Visualize the bench’s design in your kitchen space. Will it complement the existing decor? Creating a plan on paper can help you adjust and fine-tune your ideas. Have you thought about future-proofing your design? What if your storage needs change? Planning ahead ensures adaptability. — Incorporating these steps can make your kitchen bench project not only successful but also a fun and engaging experience. Remember, thoughtful planning can save time and enhance the functionality of your kitchen space.Cutting The Wood
Creating a kitchen bench with storage begins with cutting the wood precisely. Measure each piece accurately for stability. Use quality tools to ensure smooth edges and proper fit.
Cutting the wood is an essential step in building a kitchen bench with storage. It’s where precision meets creativity, allowing your project to come to life. You might feel a mix of excitement and nervousness, especially if it’s your first DIY venture. But don’t worry! With the right guidance, you’ll turn those raw pieces of wood into a functional and beautiful piece of furniture.Selecting The Right Wood Type
Choosing the right wood is like picking the perfect ingredients for a recipe. You want something durable and easy to work with. Consider woods like pine or plywood. They are affordable and perfect for beginners. Pine is soft, making it easier to cut and shape. Plywood offers strength and stability, essential for the storage function of your bench. Think about the finish too; will you paint or stain it? This decision impacts your wood choice. Check for knots and grains. These affect the final look. A smooth grain gives a sleek finish, while knots add character. It’s all about what fits your style.Using Safety Precautions
Safety should be your top priority when cutting wood. A small mistake can lead to injury. Always wear protective gear like goggles and gloves. They protect your eyes and hands from flying debris and splinters. Before starting, inspect your tools. Are your saw blades sharp and in good condition? Dull blades can cause accidents and ruin your wood. Keep your workspace clean and organized. A cluttered area increases the risk of mishaps. Remember to focus on the task at hand. Distractions can lead to mistakes. Wouldn’t you prefer a smooth cut over a jagged edge? Keep your mind and eyes on the wood and tools.As you embark on this wood-cutting journey, ask yourself: What do you want your bench to say about you? Each cut and choice reflects your personality and style. Embrace the process, and let your creativity flow.
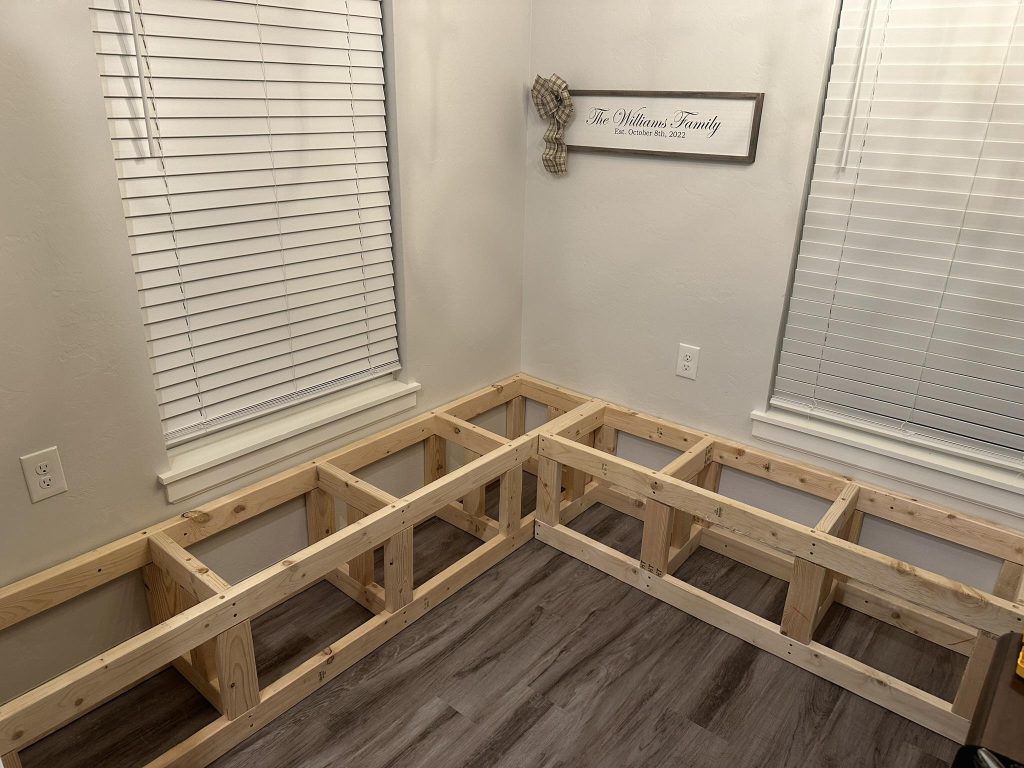
Building The Frame
Start by cutting wood pieces for the frame. Ensure precise measurements for a sturdy structure. Assemble the pieces using screws and wood glue, creating a strong foundation for your kitchen bench with storage.
Building the frame is a crucial step in creating a kitchen bench with storage. Imagine coming home with bags of groceries and finding a neatly organized spot to store them. A sturdy frame is the backbone of your bench, ensuring it can withstand daily use while providing ample storage space. Let’s dive into the essentials of assembling and securing the structure so you can confidently build a bench that’s both functional and stylish.Assembling The Base
The base is where it all begins. Start by gathering quality wood, like plywood or hardwood, as it provides durability. Cut the wood according to your desired bench dimensions. Lay out the pieces on a flat surface. Use a tape measure to ensure precision. This step is crucial as it sets the tone for the entire project. Next, think about the height. Will you be using it mainly for seating or storage? Consider the height that suits both. Assemble the base using screws and a screwdriver, which offers more stability than nails.Securing The Structure
Once the base is set, focus on securing the structure. Reinforce the corners with brackets. This adds strength and prevents wobbling. Imagine sitting on the bench with your morning coffee, only to have it wobble! Avoid this by checking every screw and joint. Tighten them with a drill or screwdriver. Adding cross supports underneath can enhance sturdiness. These are especially useful if your bench will bear heavy loads. Opt for metal or solid wood supports for best results. Ask yourself: How much weight will this bench hold? This question guides the reinforcement process. Remember, a secure structure is your peace of mind for years to come. Building a kitchen bench with storage is not just about construction—it’s about creating a space that blends seamlessly into your home and lifestyle. With a solid frame, you’re laying the foundation for a functional and beautiful addition to your kitchen. What’s your vision for the perfect kitchen bench?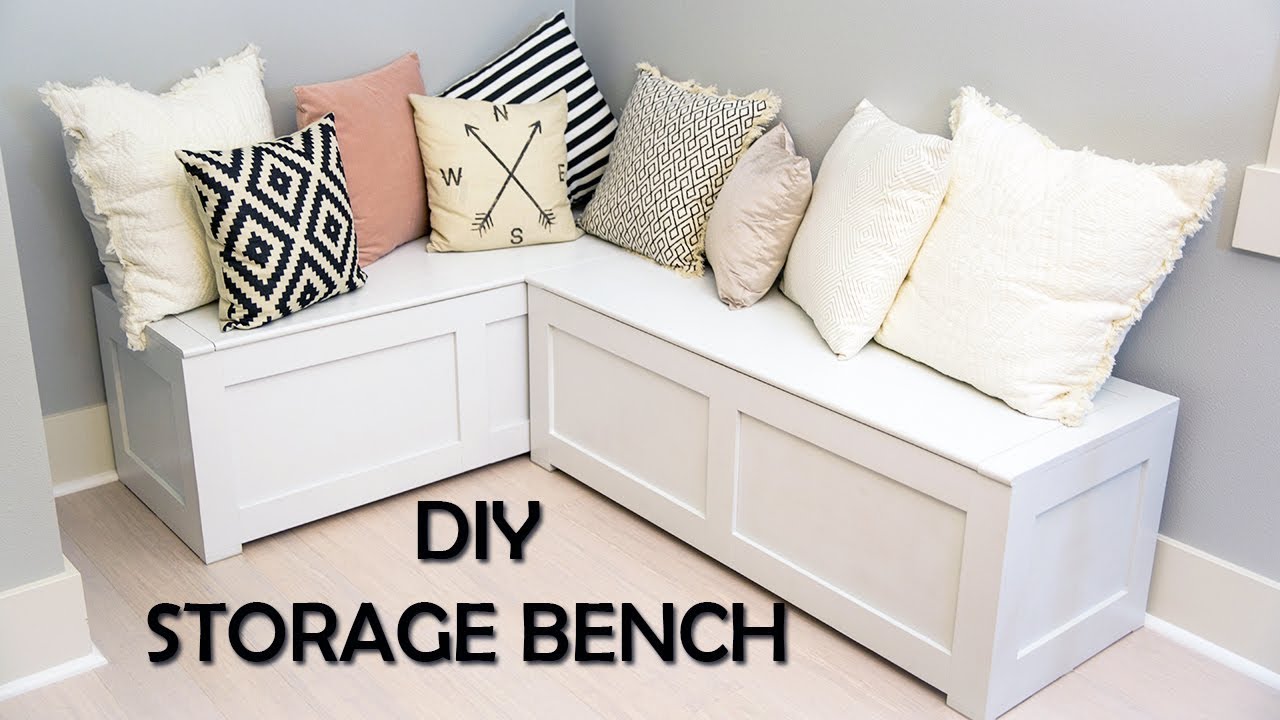
Credit: www.youtube.com
Adding Storage Compartments
Adding storage compartments to your kitchen bench enhances functionality. It maximizes space and keeps your kitchen organized. With a few thoughtful designs, you can create a bench that meets your storage needs. Consider various options, such as drawers, open shelves, or hidden compartments. These choices depend on what items you plan to store. With a bit of planning, your kitchen bench will be both stylish and practical.
Designing Storage Spaces
Think about what you need to store. Consider pots, pans, or cookbooks. Measure the space available in your kitchen. Sketch a design that fits your needs. Include different types of storage solutions. For example, tall items may need vertical space. Smaller items could fit in drawers or bins. Ensure your design complements your kitchen’s style. This will create a cohesive look.
Installing Dividers
Dividers help organize your storage compartments. They separate items, keeping them easy to access. Choose materials that match your bench’s design. Wood, metal, or plastic are popular choices. Measure the compartments before installing dividers. Cut dividers to fit snugly in each section. Secure them with brackets or screws for stability. This ensures your items stay in place.
Attaching The Bench Top
Secure the bench top firmly onto the kitchen bench frame. Ensure even placement to maintain balance and stability. Use screws or bolts for a tight fit, preventing movement and ensuring durability.
Attaching the bench top is a crucial step in building a kitchen bench with storage. This task not only impacts the bench’s functionality but also its aesthetic appeal. A secure and attractive bench top can transform your kitchen space, making it both useful and stylish.Choosing A Durable Surface
When selecting a surface for your bench top, durability should be your priority. Think about the daily wear and tear it will endure, from chopping to spilling. A solid wood like oak or maple offers longevity and can withstand heavy use. Consider the style of your kitchen as well. A sleek, modern kitchen might benefit from a glossy, laminated finish. In contrast, a rustic kitchen may look best with a textured, reclaimed wood top. What matches your kitchen’s vibe?Securing The Top Properly
To secure the bench top, align it with the base structure first. Make sure it’s perfectly level and fits snugly. This step ensures that your bench top won’t wobble or shift with use. Use strong, reliable screws to fasten the top. Drill through the support beams underneath for extra stability. Remember, the strength of your bench is only as good as the screws holding it together. Finally, check for any gaps or uneven areas. Adjust as necessary to ensure a seamless finish. A well-secured bench top not only looks professional but also boosts your confidence in using the space effectively. Is there a better feeling than knowing your hard work has paid off in a sturdy, beautiful piece?Finishing Touches
As you approach the final stages of building your kitchen bench, it’s time to focus on the finishing touches. These steps ensure your bench looks polished and lasts for years. Properly finishing your bench enhances its appearance and durability. Let’s explore the essential steps to give your bench a perfect finish.
Sanding And Smoothing
Sanding is crucial for a smooth surface. Start with coarse sandpaper to remove rough spots. Gradually switch to finer grades for a sleek finish. Pay special attention to corners and edges. They need extra care to achieve a smooth feel. Sanding ensures paint or stain adheres well.
Applying Paint Or Stain
Choose a paint or stain that matches your kitchen’s style. Applying paint gives a modern look. Use a primer first for better paint adhesion. Staining reveals the wood’s natural beauty. It adds warmth and character. Apply evenly with a brush or cloth. Let each coat dry fully before adding another.
Consider using a sealant for extra protection. It keeps the surface safe from spills and scratches. Your bench will remain beautiful with a proper finish.
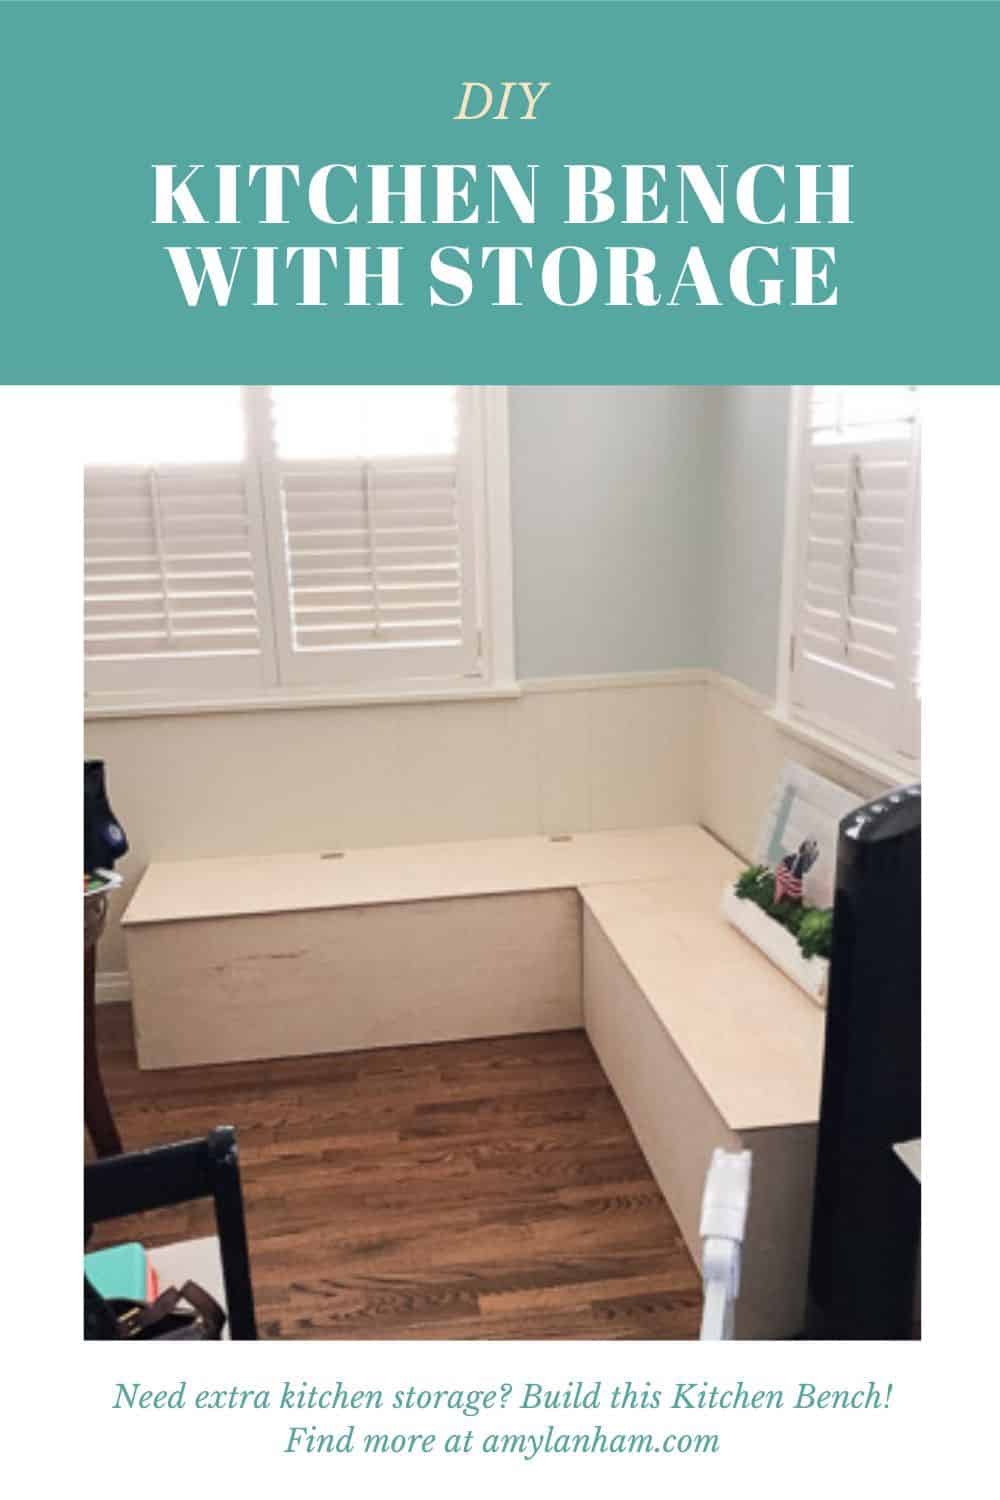
Installing The Bench In The Kitchen
Building a kitchen bench with storage adds style and function to your space. Follow simple steps to create extra seating and hidden storage. Enhance your kitchen’s look while keeping it organized and clutter-free.
When you’ve crafted the perfect bench with storage for your kitchen, the next step is to install it seamlessly. This phase is crucial for both functionality and aesthetics. After all, you want your bench to be a practical addition to your space, while looking like it’s always been part of the kitchen. Let’s dive into the steps for installing your bench effectively.Positioning For Optimal Use
The positioning of your bench can make or break its utility. Consider the flow of your kitchen and how you typically use the space. Place the bench where it complements your daily routine. Is it near the dining table for easy access to storage, or perhaps by a window for a cozy reading nook? Measure twice, install once. Ensure there’s enough room to open cabinet doors and move freely around the bench. A well-positioned bench becomes a hub of activity. Think about how you’ll use it most, and position accordingly.Securing To The Wall
Safety first: securing your bench to the wall is essential. Use sturdy brackets or L-brackets for a secure fit. This not only ensures stability but also prevents accidental tipping, especially if you have kids or pets. Find the wall studs using a stud finder, as these are the most secure points for attaching your bench. Fasten the brackets to both the bench and the wall studs for maximum security. This step ensures your bench remains a safe and reliable part of your kitchen. Have you ever had furniture tip over unexpectedly? Ensuring your bench is securely fastened can prevent such mishaps. It’s a small step with a big impact on safety and peace of mind.Maintenance Tips
Building a kitchen bench with storage requires regular cleaning to keep it tidy. Use a damp cloth to remove dust. Check for loose screws and tighten them to ensure safety. Keep the storage compartments organized by decluttering regularly. This ensures easy access and prevents damage over time.
Building a kitchen bench with storage is a rewarding project that adds both functionality and style to your home. However, maintaining your creation is key to ensuring it serves you well for years. Maintenance isn’t just about fixing problems; it’s also about preventing them. By taking some simple steps, you can keep your kitchen bench looking and functioning great. Let’s dive into some practical maintenance tips.Cleaning And Care
Regular cleaning is essential to keep your kitchen bench in top shape. Use a soft, damp cloth to wipe down surfaces and remove any dust or spills. Avoid harsh chemical cleaners, as they can damage the finish and wear down the materials over time. Occasionally, apply a mild wood polish or oil to wooden surfaces to maintain their luster. This not only enhances the appearance but also protects against moisture. Don’t forget to clean the storage compartments, as crumbs and dust can accumulate quickly.Inspecting For Repairs
Periodic inspections can save you from bigger headaches down the road. Check for loose screws or nails that might need tightening. This is especially important if your bench is used frequently or if children use it for play. Look for any signs of wear, such as chipped paint or scratched surfaces. Address these issues promptly to prevent further damage. If you spot any cracks or structural weaknesses, consider reinforcing the area or consulting a professional for advice. Maintaining your kitchen bench with storage doesn’t have to be a daunting task. With regular cleaning and careful inspections, you can ensure your bench remains both beautiful and functional. What small steps will you take today to preserve your handiwork?Frequently Asked Questions
How Do I Choose Materials For A Kitchen Bench?
Selecting materials depends on your budget and style preference. Popular options include wood, metal, and composite materials. Wood offers a classic look, while metal provides durability. Composite materials are cost-effective and versatile. Consider space, functionality, and aesthetics to make the best choice for your kitchen bench with storage.
What Tools Are Needed To Build A Kitchen Bench?
Essential tools include a saw, drill, measuring tape, and screwdriver. You may also need clamps and a sander for finishing. Choose tools based on your project’s complexity and material type. Basic hand tools suffice for simpler designs, while power tools are recommended for larger, intricate projects.
How Much Does It Cost To Build A Kitchen Bench?
Costs vary based on materials and design complexity. A DIY kitchen bench can range from $100 to $500. Using premium materials or hiring professional help increases costs. Plan your budget by estimating material prices and labor time. Compare DIY versus professional costs to make an informed decision.
Can I Customize Storage In My Kitchen Bench?
Yes, customization is possible to suit your needs. You can add drawers, shelves, or cabinets. Consider the items you plan to store and design accordingly. Adjustable shelves and modular units offer flexibility. Customize dimensions to fit available space and enhance your kitchen’s functionality.
Conclusion
Creating a kitchen bench with storage is a rewarding DIY project. It adds both style and functionality to your space. You save money and customize it to fit your needs. Gather materials, follow steps, and enjoy the process. A well-made bench enhances kitchen comfort and organization.
Your efforts bring a personal touch to your home. With patience and care, you can craft a unique piece. It’s a project that truly pays off. Enjoy your new kitchen addition. Happy building!