Have you ever found yourself staring at a pile of dirty kitchen tools, wondering where to even begin? Whether you’re a cooking novice or a seasoned chef, keeping your kitchen tools clean is essential for both safety and efficiency.
But what is the first step in cleaning kitchen tools? Understanding this crucial first step can transform your kitchen cleaning routine from a dreaded chore into a simple habit. Imagine the satisfaction of having spotless, ready-to-use utensils every time you cook.
It all starts with one straightforward action that sets the stage for cleanliness and organization. In this blog post, we will uncover this vital first step and guide you through a process that not only makes cleaning easier but also enhances your cooking experience. Get ready to discover how a small change can make a big difference in your kitchen!
Credit: www.firstcommand.com
Importance Of Clean Kitchen Tools
When you step into your kitchen, the cleanliness of your tools can make or break your cooking experience. Clean kitchen tools are essential for maintaining hygiene and ensuring the flavors of your dishes remain intact. Imagine preparing a vibrant salad, only to find it tainted by remnants of yesterday’s garlic bread. Keeping tools clean isn’t just about appearance; it’s about preserving the integrity of your meals and ensuring your family’s health.
Prevention Of Cross-contamination
Cross-contamination is a silent kitchen villain. It occurs when bacteria from raw foods spread to other surfaces or foods. Clean tools prevent this from happening. By washing your cutting boards and knives immediately after use, you reduce the risk of spreading harmful bacteria. This simple act can safeguard against foodborne illnesses.
Enhancement Of Food Flavor
Ever noticed a strange taste in your pasta sauce? Dirty utensils might be the culprit. Residues and odors from previous meals can seep into your food, altering its taste. When you ensure your pots and pans are spotless, you allow the true flavors of your ingredients to shine. Imagine the satisfaction of serving a dish that’s as delicious as you intended.
Prolonging The Life Of Your Tools
Regular cleaning extends the lifespan of your kitchen tools. The accumulation of grime can lead to rust and wear. By simply washing and drying them properly, you protect your investment. It’s akin to caring for a prized possession, ensuring it serves you well for years to come.
Creating A Positive Cooking Environment
A clean kitchen boosts your mood. It reduces clutter and chaos, making cooking a more enjoyable experience. You’ll find yourself more motivated to try new recipes and explore culinary creativity. Isn’t it refreshing to cook in a space where cleanliness reigns?
So, what’s your kitchen cleaning routine like? The first step in cleaning kitchen tools might just be the key to unlocking a more enjoyable and healthy cooking experience. Take the time to give your tools the attention they deserve. Your meals—and your family—will thank you.

Credit: www.cleanipedia.com
Understanding Different Kitchen Tools
Understanding different kitchen tools is vital for effective cleaning. Each tool serves a unique purpose and requires specific care. Knowing the types of tools in your kitchen helps streamline the cleaning process. This understanding helps in choosing the right cleaning method for each tool.
Common Kitchen Tools
Common kitchen tools include spoons, forks, and knives. These are used daily for meal preparation and eating. Cutting boards and mixing bowls are other essential tools. Most of these tools are made from stainless steel, plastic, or wood. Stainless steel tools are durable and easy to clean. Wooden tools need gentle cleaning to prevent damage.
Pots and pans are crucial for cooking. They come in various materials like stainless steel, cast iron, or non-stick. Each material requires different cleaning approaches. Stainless steel pots can handle scrubbing. Non-stick pans need careful washing to preserve their coating.
Specialized Equipment
Specialized equipment includes blenders, food processors, and coffee makers. These tools are used for specific tasks like blending, grinding, or brewing. They have multiple parts that require thorough cleaning. Blenders have blades that need careful handling. Food processors have removable parts needing proper washing.
Pressure cookers and slow cookers are popular for cooking meals. They have seals and lids that require detailed cleaning. Always check the manufacturer’s instructions for cleaning guidance. Clean specialized equipment meticulously to ensure their longevity.
Initial Assessment
Cleaning kitchen tools starts with a crucial first step: initial assessment. This step helps determine which tools need cleaning and how much effort is required. Making an initial assessment ensures you don’t miss any dirty items. It helps prioritize tasks effectively.
Identifying Dirty Tools
Begin by gathering all kitchen tools in one place. Look closely at each item. Check for visible dirt or food residues. Don’t forget about rarely used tools. They may be hiding stubborn grime. Identify which tools are clean or dirty. This saves time later.
Evaluating Cleaning Needs
Once you know which tools need cleaning, consider their material. Different materials require different cleaning methods. Metal tools may need scrubbing. Wooden tools might need gentle washing. Evaluate the level of dirtiness. Light stains need less cleaning effort. Greasy tools require more attention. This evaluation helps plan the right cleaning approach.
Safety Precautions
Cleaning kitchen tools is essential for maintaining hygiene and safety. Before starting, understanding safety precautions is crucial. It helps prevent accidents and ensures a smooth cleaning process. Let’s explore two important aspects: handling sharp objects and using cleaning agents.
Handling Sharp Objects
Sharp objects like knives can be dangerous. Always handle them with care. Use a stable surface to clean them. Never leave them in soapy water where they can’t be seen. This prevents accidental cuts or injuries. Dry them immediately after washing to avoid rust.
Using Cleaning Agents
Cleaning agents can have strong chemicals. Read labels to know their proper use. Wear gloves to protect your skin from irritation. Ensure the area is well-ventilated. This helps avoid inhaling harmful fumes. Rinse tools thoroughly to remove any residue. Store cleaning agents in a safe place, away from children.
Gathering Cleaning Supplies
Cleaning kitchen tools starts with gathering the right supplies. Proper cleaning keeps tools in good condition. It ensures hygiene in food preparation. Using the right products and tools is crucial. This makes cleaning efficient and effective.
Essential Cleaning Products
Start with dish soap. It removes grease and food residue. Choose a mild, eco-friendly option. Vinegar is great for disinfecting. It is natural and safe for most surfaces. Baking soda helps with tough stains. It acts as a gentle abrasive. Bleach can be used for deeper cleaning. Ensure it’s safe for the specific tool.
Tools For Cleaning
Sponges are essential. They help scrub off dirt and grime. Use soft sponges to prevent scratches. Brushes are useful for hard-to-reach spots. A toothbrush works well on small tools. Microfiber cloths dry surfaces without leaving streaks. They are absorbent and gentle. Scouring pads tackle stubborn stains. They are effective on pots and pans.
Pre-cleaning Preparation
Starting with gathering all necessary supplies helps in cleaning kitchen tools effectively. Organize sponges, brushes, and detergent nearby. This preparation ensures a smooth and efficient cleaning process, saving time and effort.
Cleaning kitchen tools might seem straightforward, but diving into the process without a plan can lead to overlooked details and wasted time. Pre-cleaning Preparation is the crucial first step that sets the stage for effective cleaning. It ensures you’re not just moving dirt around but actually making your kitchen tools sparkle. Ready to transform your cleaning routine?Organizing Workspace
Begin by clearing your kitchen counter or sink area. A clutter-free space makes it easier to access each tool. It also prevents clean items from getting dirty again. Consider grouping your tools by type or material. This method helps streamline the cleaning process. It’s also a great opportunity to check if you have duplicates or worn-out tools that need replacing.Removing Food Residue
Start by scraping off any leftover food particles. Use a spatula or brush to gently remove residue without damaging your tools. This step prevents stubborn stains and makes washing easier. For sticky or burnt-on food, soak the tools in warm water for a few minutes. This loosens the residue and requires less scrubbing. Have you ever noticed how much easier it is to clean a pan after soaking it? Do you often skip these pre-cleaning steps? By taking a few minutes to prepare, you save time in the long run and ensure your kitchen tools are thoroughly cleaned.Cleaning Techniques
Cleaning kitchen tools properly keeps your cooking space safe and hygienic. Different tools need different cleaning methods. This ensures they last longer and work well. Knowing the right techniques saves time and effort. Let’s explore the best cleaning methods.
Manual Cleaning Methods
Some kitchen tools need a gentle touch. Use warm water and mild soap. Scrub with a soft brush or sponge. This removes food particles and grease. Be sure to rinse thoroughly. Dry the tools with a clean towel. This prevents rust and bacteria.
For stubborn stains, use baking soda and water. Make a paste. Apply it to the stain. Scrub gently until the stain disappears. Rinse well. Dry immediately to avoid moisture damage.
Machine Cleaning Options
Dishwashers save time for many kitchen tools. Check if the tool is dishwasher-safe first. Place it in the right rack. Use a gentle cycle and mild detergent. Avoid high heat settings. They can warp or damage tools.
For blenders or food processors, disassemble removable parts. Place them in the dishwasher if safe. Hand wash the motor base with a damp cloth. Dry parts thoroughly before reassembling.
Drying And Storage
Drying and storage are crucial steps in cleaning kitchen tools. Proper drying prevents bacteria growth and keeps tools in good condition. Safe storage ensures tools are easily accessible and maintains their longevity. Follow these guidelines to keep your kitchen organized and hygienic.
Proper Drying Techniques
Effective drying starts with clean towels or air drying racks. Use towels to remove excess moisture from tools. Ensure towels are clean and dry before use. For air drying, place tools in an airy space. Make sure tools are not stacked to allow air circulation. This prevents water spots and rust.
Safe Storage Practices
Store kitchen tools in designated spaces. Use drawers or cabinets with enough room. Avoid overcrowding to prevent damage and ensure easy access. Consider using dividers to separate different tools. Label spaces for specific items to maintain order. Regularly check stored tools for moisture or damage. This keeps them ready for use and extends their life.
Maintaining Cleanliness
Starting with rinsing is crucial in cleaning kitchen tools. Remove food particles under running water. This prevents residue from hardening.
Maintaining cleanliness in your kitchen is not just about keeping things tidy. It’s about ensuring the tools you use to prepare meals are safe and hygienic. Whether you’re a culinary novice or a seasoned chef, the first step in cleaning kitchen tools is crucial. Imagine whipping up a delicious meal only to find your spatula wasn’t clean, potentially ruining your creation. Let’s dive into how you can maintain cleanliness effectively.Routine Cleaning Schedule
Establishing a routine cleaning schedule is the backbone of maintaining cleanliness. Consistency is key. After each cooking session, make it a habit to clean your tools. Even if you’re tired, a quick wash can prevent bacteria build-up. Think about your daily rituals. Would you skip brushing your teeth before bed? Probably not. Approach cleaning your kitchen tools with the same regularity. A simple rinse and scrub can go a long way.Preventive Measures
Preventive measures are essential in keeping your kitchen tools in top shape. Start by using separate cutting boards for raw meats and vegetables. This small step prevents cross-contamination. Consider storing your kitchen tools in a dry place. Moist environments can lead to mold, and you certainly don’t want that on your utensils. If your tools are wooden, oil them occasionally to prevent drying and cracking. Have you ever noticed your knife not cutting as smoothly as it used to? Sharpening it regularly not only enhances its performance but also prevents accidents caused by dull blades. Keeping your tools maintained is part of keeping them clean. These strategies might seem simple, but they are effective in ensuring your kitchen tools are always ready for action. As you implement these practices, you’ll find that maintaining cleanliness becomes second nature, enhancing your cooking experience. How do you ensure your kitchen tools are clean? Share your thoughts and tips!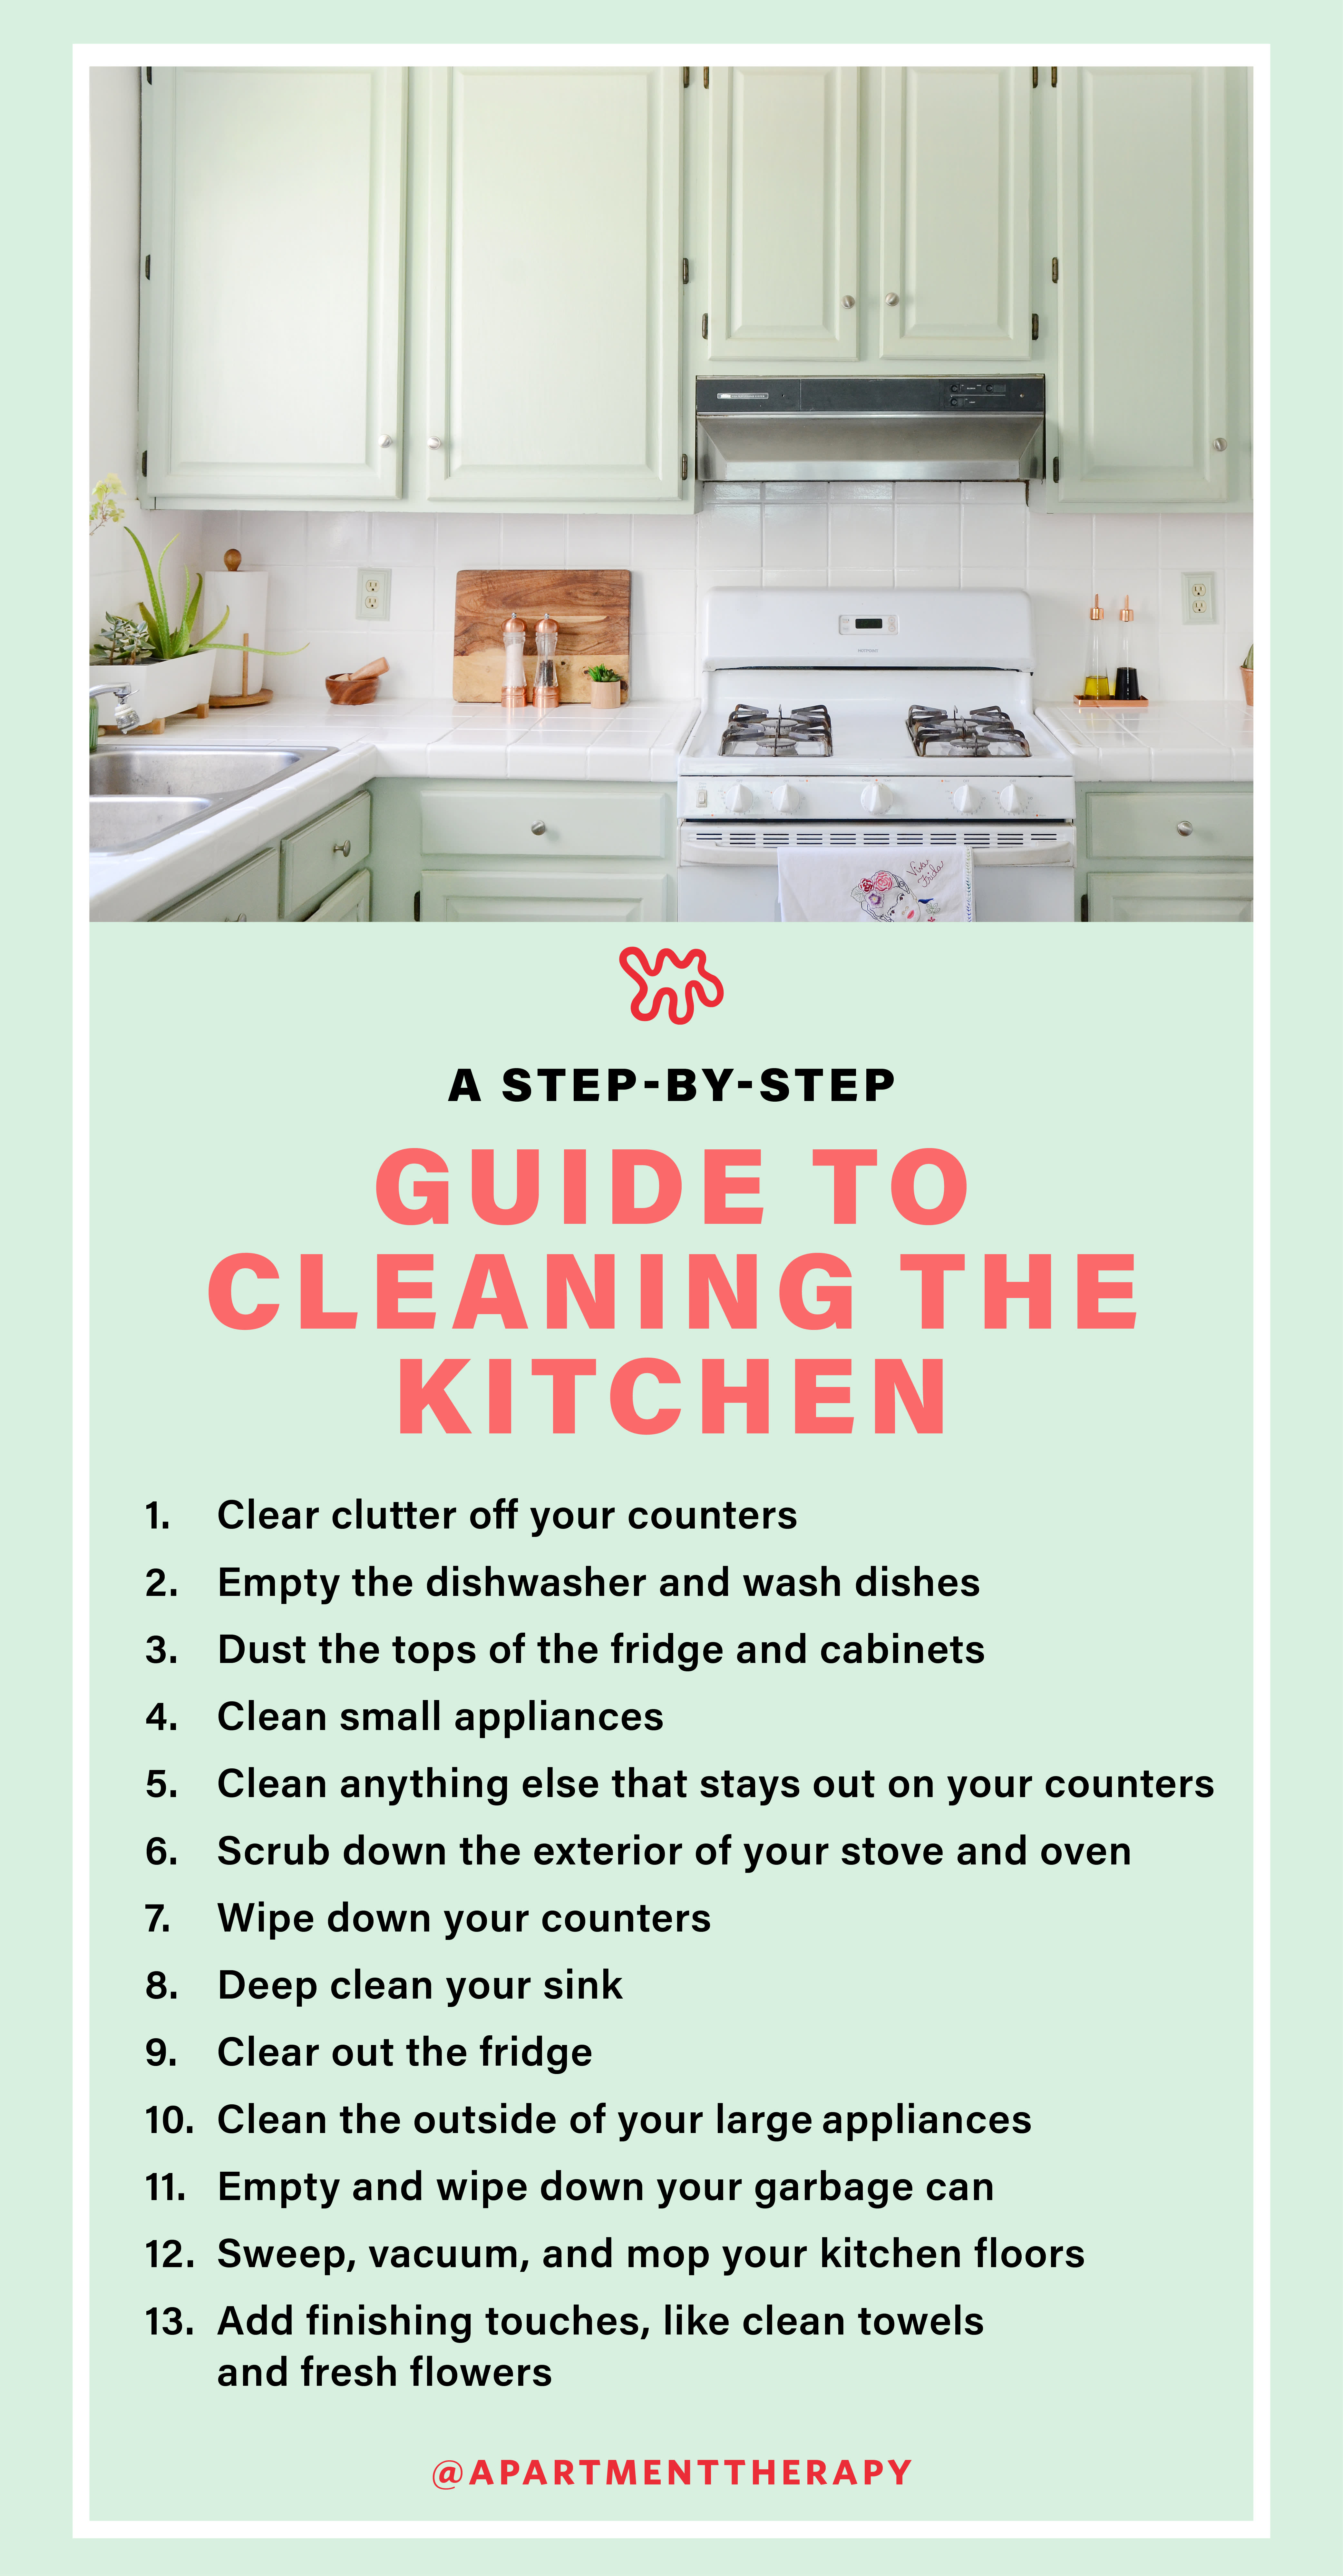
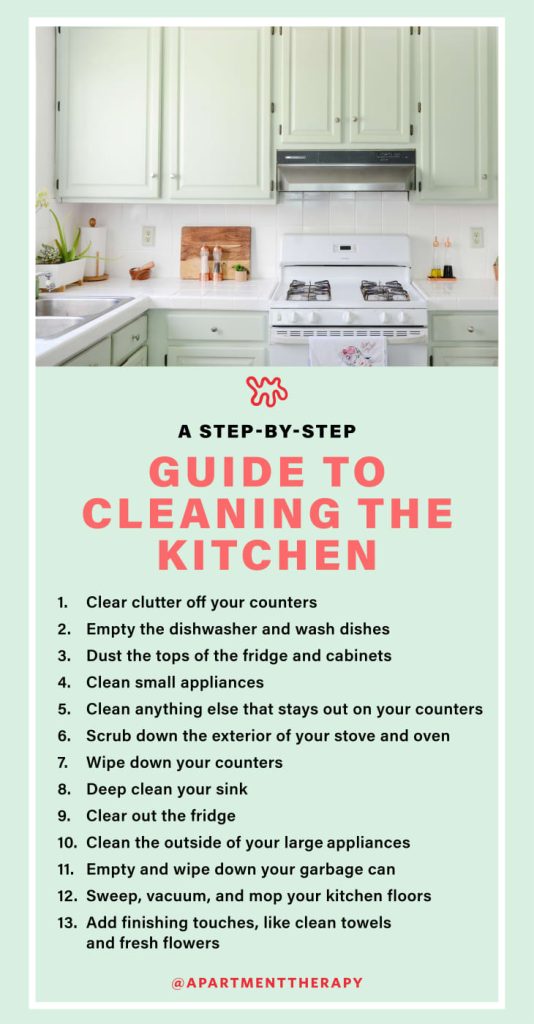
Credit: www.apartmenttherapy.com
Frequently Asked Questions
What Is The First Step In Cleaning Kitchen Equipment?
Begin by unplugging and disassembling the kitchen equipment for safe and thorough cleaning. Ensure all detachable parts are removed.
How To Clean Kitchen Tools Step By Step?
Start by rinsing kitchen tools under warm water. Apply dish soap on a sponge and scrub thoroughly. Pay attention to crevices and handles. Rinse off soap with clean water. Dry tools with a clean towel or air-dry them. Store tools in a clean, dry place to prevent bacteria growth.
What Is The First Step In Disinfecting Tools?
The first step in disinfecting tools is thoroughly cleaning them with soap and water to remove debris.
What Is The Order Of Washing Kitchen Tools?
Wash kitchen tools in this order: glassware, silverware, plates, cutting boards, pots, and greasy pans last. This prevents cross-contamination and ensures effective cleaning. Use hot, soapy water and rinse thoroughly. Dry with a clean towel or air dry for best results.
Conclusion
Starting your kitchen cleaning with the right step matters. Begin by gathering all dirty tools in one spot. This makes sorting and washing easier. Rinse each tool under warm water to remove loose debris. Choose a mild detergent for effective cleaning.
Scrub gently, focusing on areas with grime. Don’t forget handles and edges. Once clean, rinse thoroughly. Dry each tool with a clean cloth. This prevents water spots and bacteria growth. Store tools properly to keep them ready for next use.
Consistent cleaning keeps your kitchen safe and hygienic. Happy cooking!