Imagine walking into your kitchen and being greeted by a fresh, clean scent. Your countertops gleam, free from grime and sticky residues.
Achieving this is easier than you might think, and it doesn’t require harsh chemicals or expensive products. Learning how to make homemade kitchen surface cleaner not only saves you money but also ensures a healthier environment for you and your loved ones.
You might be surprised at how effective natural ingredients can be in tackling everyday messes. Are you ready to discover how you can whip up your own powerful cleaner using items you probably already have in your pantry? Let’s dive into the simple steps that will transform your cleaning routine and bring a refreshing sparkle to your kitchen surfaces.

Credit: www.bobvila.com
Ingredients Selection
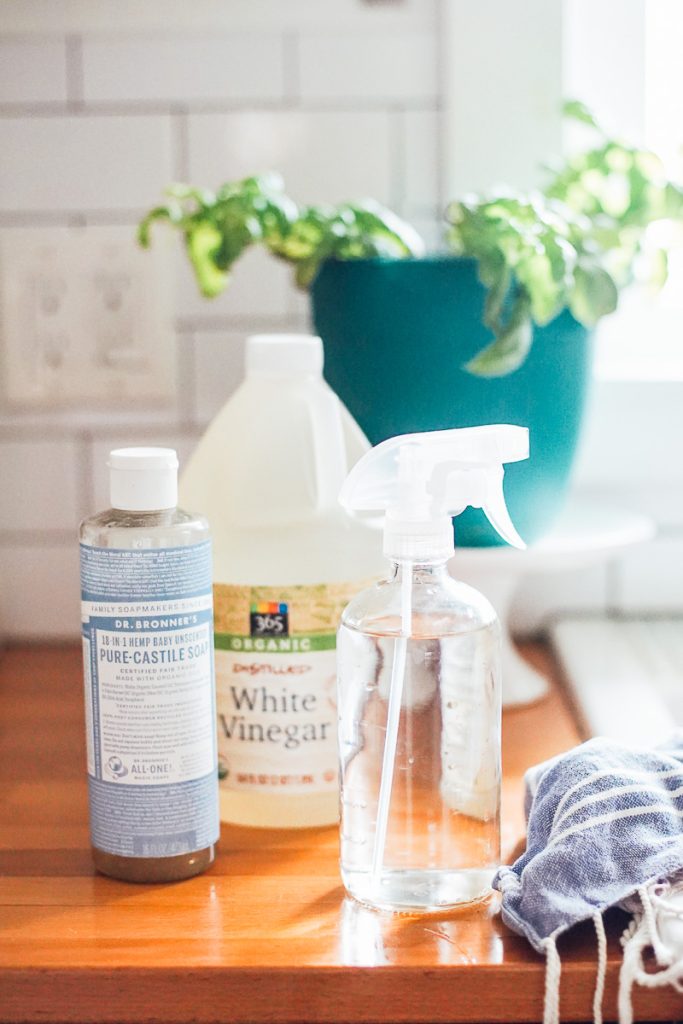
Choosing the right ingredients is essential for making an effective homemade kitchen surface cleaner. Common items like vinegar, baking soda, and lemon juice work well. These natural ingredients are safe and help remove stains and germs from surfaces. Mix them properly for a clean, fresh kitchen environment.
Selecting the right ingredients is crucial when crafting a homemade kitchen surface cleaner. You want a cleaner that’s both effective and safe for everyday use. This means choosing ingredients that are gentle on surfaces but tough on grime.Natural Ingredients
Opt for ingredients that are naturally derived. Vinegar is a great choice; its acidic nature helps break down dirt and grime. Baking soda is another must-have. It acts as a gentle abrasive and deodorizer. Consider using lemon juice for its antibacterial properties and fresh scent. If you want a touch of fragrance, a few drops of essential oils like lavender or tea tree can enhance the cleaning power while leaving a pleasant aroma.Avoiding Harmful Chemicals
Steer clear of harsh chemicals that can harm your surfaces or your health. Many commercial cleaners contain chemicals that can cause skin irritation or respiratory issues. Instead, choose ingredients that you can find in your pantry or local store. This not only keeps your home safe but also ensures you’re not contributing to environmental pollution. Have you ever noticed how a simple homemade cleaner can outperform many store-bought options? By avoiding harmful chemicals, you ensure a healthier home environment for you and your family.Essential Tools
Creating your own kitchen surface cleaner is easy and rewarding. You need essential tools for this task to ensure efficiency. This section explores the mixing equipment and storage solutions you need.
Mixing Equipment
A sturdy mixing bowl is essential for combining ingredients. It should be large enough to hold all your components comfortably. Use a whisk or spoon to stir the mixture until it’s smooth. A measuring cup ensures precise ingredient quantities. Accurate measurements help maintain consistency in your cleaner.
Funnel is another important tool. It helps transfer liquids into bottles without spills. This saves time and reduces mess. Ensure your funnel fits the neck of your chosen bottle.
Storage Solutions
Choose glass spray bottles for storing your cleaner. Glass is ideal because it doesn’t react with the cleaner. This keeps your solution potent and effective. Ensure the spray nozzle is adjustable. It allows you to control the spray pattern for different surfaces.
Label your bottle clearly. Include the date of preparation and contents. This helps in tracking the usability of your cleaner. Store the bottle in a cool, dark place. This preserves the mixture’s effectiveness over time.
Recipe Variations
Creating your own kitchen surface cleaner is not only cost-effective but also ensures you know exactly what’s in it. While a basic recipe can work wonders for everyday cleaning, sometimes you need variations to tackle specific tasks. Whether you’re dealing with tough stains or need a gentle cleaner for wooden surfaces, having a few recipes up your sleeve can be incredibly handy. Let’s dive into some recipe variations that can make your cleaning routine more efficient and tailored to your needs.
Basic Cleaner Recipe
Start with a simple mix that works for most surfaces. Combine equal parts water and white vinegar in a spray bottle. Add a few drops of essential oil like lemon or lavender for a pleasant scent. Shake well and you’re ready to clean. This recipe is straightforward and effective, cutting through grime with ease.
Consider this: while cleaning last week, I realized my kitchen smelled fresher and cleaner using this mix. It’s amazing how a small tweak like essential oils can elevate the experience.
For Tough Stains
Sometimes, the basic recipe might not be enough. For stubborn stains, mix baking soda and vinegar to form a paste. Apply it directly to the stain and let it sit for 10 minutes. Scrub gently with a sponge and rinse with water. The fizzing action helps break down tough spots.
Have you ever felt frustrated with a stain that just won’t budge? This method is my go-to for those moments, and it never fails to surprise me with its effectiveness.
For Wooden Surfaces
Wooden surfaces need a bit more care. Mix half a cup of olive oil with a quarter cup of white vinegar. Apply it lightly with a soft cloth, rubbing along the grain. The oil nourishes the wood while the vinegar cleans. Avoid using water as it can warp the wood.
Last month, I noticed my wooden countertop looking dull. Using this method brought back its shine without harsh chemicals. Have you tried this gentle approach for your wooden surfaces?
Each recipe has its unique benefits, catering to different needs and surfaces. Which one will you try first to transform your kitchen cleaning routine?
Application Techniques
Cleaning kitchen surfaces is essential for a tidy home. Using homemade cleaners saves money and reduces chemicals. Knowing the right application techniques ensures effective cleaning. This guide offers simple steps for applying your homemade cleaner.
Proper Spraying Methods
Use a clean spray bottle for your homemade cleaner. Hold the bottle about 6 inches from the surface. Spray evenly across the area. Ensure the entire surface gets a light mist. Avoid soaking the surface as it can damage some materials. A light mist provides enough cleaner to work effectively.
Buffing And Polishing
Use a clean, soft cloth for buffing. Microfiber cloths work best for shining surfaces. Gently rub the cloth in small circles. This motion lifts dirt and grime effectively. Repeat until the surface shines. For stubborn spots, apply more cleaner and buff again. Ensure all cleaner is wiped away to avoid streaks.
Safety Precautions
Creating homemade kitchen surface cleaner requires careful handling of ingredients. Use gloves to protect skin from vinegar and essential oils. Ensure proper ventilation to avoid inhaling strong fumes.
Cleaning your kitchen surfaces with homemade cleaners is a satisfying and eco-friendly endeavor. Yet, safety precautions are crucial to ensure that you protect yourself and your home from unintended mishaps. Whether you’re mixing vinegar with essential oils or using baking soda as a scrubbing agent, understanding the safety measures can make your cleaning routine both safe and effective.Protective Gear
Wearing the right protective gear is the first step in keeping yourself safe. Gloves are essential, especially if you have sensitive skin. They not only protect your hands from strong cleaning agents but also prevent skin irritations. Consider wearing goggles if you’re working with acidic substances like vinegar. This might seem excessive, but a splash in the eye can be painful and damaging. It’s a precaution worth taking, even if you think you’re being careful. Think about your clothing too. Donning an apron or old clothes can save your favorite outfit from bleach or other staining agents. Have you ever ruined a beloved shirt because you were too eager to start cleaning? Don’t make that mistake again—gear up.Safe Handling Instructions
Handling homemade cleaners requires attention to detail. Label your bottles clearly to avoid confusion, especially if you’re storing them. This simple step can prevent accidents, like mistakenly using a surface cleaner as a glass cleaner. When mixing ingredients, follow the recipe accurately. Changing ratios might lead to ineffective cleaning or worse, a chemical reaction. Have you ever mixed vinegar and baking soda without realizing it would fizz up unexpectedly? Stick to the formula for safety. Use a well-ventilated area for mixing and applying your cleaners. The fumes from some ingredients can be overwhelming and harmful if inhaled in large quantities. Imagine breathing in harsh fumes while cleaning—it’s not pleasant or safe. Safety in the kitchen isn’t just about avoiding cuts and burns. It’s about ensuring your cleaning habits are as safe as they are effective. Are you ready to clean with confidence?
Credit: www.goodhousekeeping.com
Eco-friendly Practices
Crafting a homemade kitchen surface cleaner is simple and eco-friendly. Combine vinegar, water, and essential oils for a natural clean. This blend cuts grease and leaves surfaces sparkling without harmful chemicals.
Creating a homemade kitchen surface cleaner is not only a fun DIY project but also a step towards more eco-friendly practices in your home. By using sustainable ingredients and reducing waste, you can ensure your cleaning routine is both effective and kind to the planet. Let’s dive into how you can make greener choices while keeping your kitchen spotless.Sustainable Ingredients
Choosing sustainable ingredients for your cleaner is crucial. Opt for natural substances like vinegar, baking soda, and essential oils. These are not only effective but also readily biodegradable. Vinegar, for instance, is a powerful disinfectant. It cuts through grease and leaves surfaces sparkling. Pair it with a few drops of lemon or tea tree oil, and you’ve got a potent cleaner that smells fresh. Baking soda is excellent for scrubbing. It tackles tough stains without scratching surfaces. Add a bit of water to make a paste, and you can use it for more stubborn grime.Reducing Waste
Making your own kitchen cleaner helps reduce waste significantly. Consider how many plastic bottles you discard each year from store-bought cleaners. By using reusable spray bottles, you cut down on this plastic waste dramatically. Repurpose old spray bottles by cleaning them thoroughly. This not only saves money but also keeps more plastic from ending up in landfills. Think about your ingredient packaging, too. Buy in bulk or choose products with minimal packaging to lessen your environmental footprint. Every small change adds up, leading to a more sustainable lifestyle. Have you ever considered how much waste your cleaning habits create? By making small adjustments, you can contribute to a healthier planet. Start with your kitchen cleaner and see where else you can make eco-friendly changes in your home.Troubleshooting Common Issues
Creating a homemade kitchen surface cleaner can sometimes lead to common issues. Mix ingredients carefully to prevent residue or streaks. Ensure proper storage to maintain effectiveness over time.
Making your own kitchen surface cleaner can be incredibly satisfying, but it’s not always smooth sailing. You might encounter issues that leave you scratching your head. Let’s dive into some common troubleshooting tips to ensure your homemade cleaner works like a charm.Residue Problems
Sometimes, homemade cleaners can leave behind a sticky or cloudy residue. This often happens when the cleaner isn’t rinsed properly. To fix this, use a clean, damp cloth to wipe down surfaces after cleaning. Another reason could be the ratio of ingredients. Make sure you’re measuring accurately. If vinegar is part of your recipe, too much can leave a film. Adjusting the mix can help you find the perfect balance. Have you ever found streaks on your shiny countertops? Adding a splash of rubbing alcohol can prevent streaks and enhance shine. It’s like a secret ingredient that makes everything sparkle.Effectiveness Concerns
Worried your cleaner isn’t tackling grime effectively? Consider the ingredients you’re using. Essential oils, like tea tree or lavender, have antibacterial properties. They add a powerful punch to your cleaner. If stains persist, let the cleaner sit for a few minutes before wiping. This gives it time to break down stubborn spots. Just remember not to let it dry completely, as it could make wiping harder. Do you feel like your cleaner isn’t cutting through grease? Adding a bit of baking soda can boost its degreasing power. It’s a simple tweak that can make a big difference. Troubleshooting your homemade cleaner can feel like a puzzle, but with these tips, you’re well-equipped to solve it. What changes will you try next to perfect your formula?
Credit: www.leshermarble.com
Expert Insights
Making homemade kitchen surface cleaner is an art. Experts understand the science behind natural ingredients. This knowledge ensures effective cleaning without harmful chemicals. Learn from professionals to create safe and efficient cleaning solutions. Their insights make the process easy and rewarding.
Tips From Professionals
Experts suggest using vinegar. It’s a powerful cleaning agent. Mix it with water for an effective cleaner. Essential oils can enhance the scent. They also offer antibacterial properties. Lemon oil is a favorite. It adds a fresh smell and fights germs. Baking soda is another staple. It tackles tough stains and odors. Use it on greasy surfaces for best results.
Common Mistakes
Avoid using too much vinegar. It can damage surfaces. Stick to recommended ratios. Don’t mix vinegar with bleach. This creates harmful fumes. Be cautious with essential oils. Some can stain surfaces. Test on a small area first. Overuse of baking soda can scratch surfaces. Use gentle pressure when cleaning. Keep your cleaner simple and effective.
Frequently Asked Questions
What Is The Best Homemade Kitchen Surface Cleaner?
The best homemade kitchen surface cleaner combines equal parts water and white vinegar. Add a few drops of essential oil for fragrance. This mixture effectively cleans surfaces, removing grease and grime. It’s natural, cost-effective, and safe for most kitchen surfaces.
Regular use keeps your kitchen clean and fresh.
How To Make Your Own Kitchen Counter Cleaner?
Mix equal parts of water and vinegar in a spray bottle. Add a few drops of essential oil for fragrance. Shake well before each use and spray on countertops. Wipe with a clean cloth for a spotless finish. This DIY cleaner is effective and eco-friendly.
What Is The Two Ingredient Cleaning Spray For Everything?
The two-ingredient cleaning spray combines vinegar and water. Mix equal parts of each for an effective solution. This versatile spray cleans surfaces, removes stains, and deodorizes. It’s eco-friendly and safe for most surfaces. Always test on a small area first to ensure compatibility.
Can You Mix Vinegar Dawn And Rubbing Alcohol?
Yes, you can mix vinegar, Dawn, and rubbing alcohol for cleaning. Ensure proper ventilation. Avoid mixing with bleach.
Conclusion
Crafting your homemade kitchen surface cleaner is simple and rewarding. You save money and reduce chemical exposure. Plus, it’s customizable. Use your favorite scents and ingredients. This cleaner keeps surfaces fresh and germ-free. It’s perfect for daily use. Easy to make.
Easy to use. Safe for your family. Your kitchen will sparkle with minimal effort. Remember to store your cleaner in a cool, dark place. Always label your bottles. Happy cleaning with your new DIY cleaner! Enjoy a healthier, cleaner kitchen environment with ease.